The Waist-to-Height Ratio (WHtR) is the primary screening tool for body composition. It is calculated by dividing the waist circumference by the height (both in inches): Ratio = Waist / Height. A ratio of < 0.55 meets the standard (passing score). If the ratio is ≥ 0.55, the member fails the screening and must perform the Tier 2 BFA.
Waist Measurement Procedures
Waist measurement must be performed at the designated anatomical sites depending on the member's sex:
- Male: Measured at the level of the navel (umbilicus) at the end of a normal exhalation.
- Female: Measured at the natural waist at the narrowest point of the abdomen.
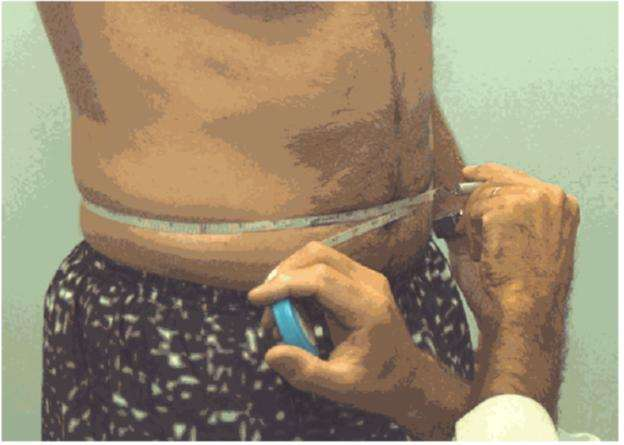
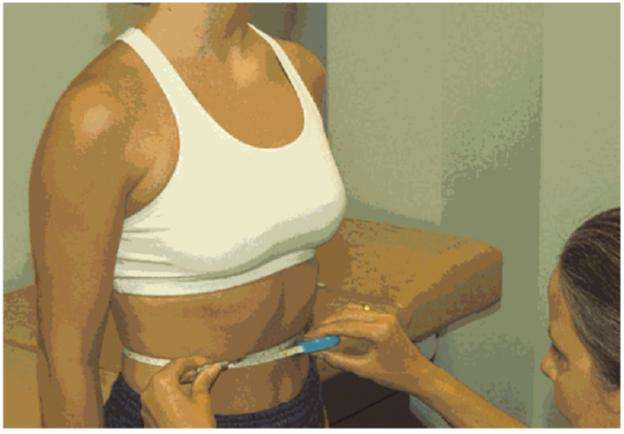
Per DAFMAN 36-2905, if a Waist-to-Height Ratio (WHtR) screening fails (ratio ≥ 0.55), a secondary Body Fat Assessment (BFA) is required. The BFA should be conducted on the same day as the physical components when possible, but must be completed within 7 calendar days (168 hours) of the initial test. This timeframe applies to both the primary bio-impedance scale (InBody 770) and the alternative tape measurement method.
- BFA Failure: If the BFA is conducted and the member exceeds the maximum body fat standard (> 26.0% for males, > 36.0% for females), the entire physical fitness assessment is rated as Unsatisfactory.
- Timeframe Exceeded: If the BFA is not completed and recorded within the 7-calendar-day (168-hour) window, the initial WHtR screening failure stands, and the entire assessment is officially marked as Unsatisfactory.
If the primary Bio-impedance scale (InBody 770) is unavailable, administrators must use the tape measure method to estimate body fat percentage. Measurements must be taken using a non-stretchable tape at the designated anatomical landmarks.
| Gender | Site | Anatomical Landmark & Procedure | Rounding Rule |
|---|---|---|---|
| Male & Female | Neck | Measure neck circumference just below the larynx (Adam's Apple) with the head straight and shoulders relaxed. | Round UP to the nearest 1/4 inch. |
| Male Only | Abdomen | Measure at the level of the navel (umbilicus) at the end of a normal relaxed exhalation. Keep tape horizontal. | Round DOWN to the nearest 1/4 inch. |
| Female Only | Waist | Measure natural waist circumference at the narrowest point of the abdomen (halfway between navel and sternum). | Round DOWN to the nearest 1/4 inch. |
| Female Only | Buttocks | Measure buttocks circumference at the point of maximum protrusion. Ensure the tape remains horizontal. | Round DOWN to the nearest 1/4 inch. |
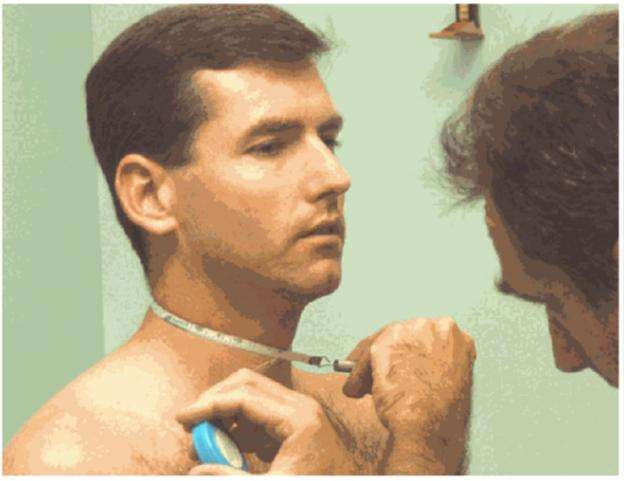
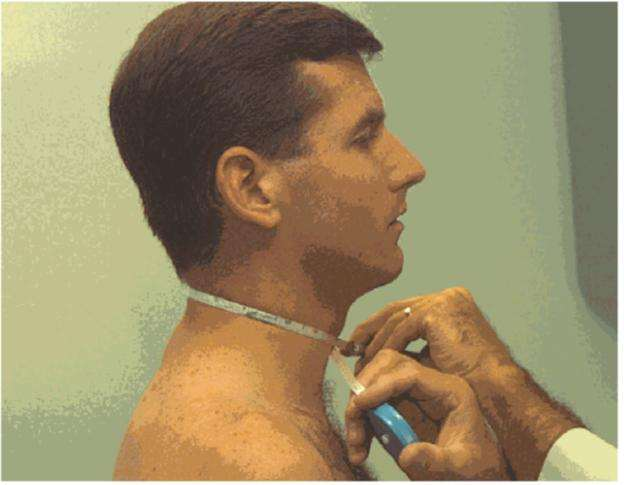
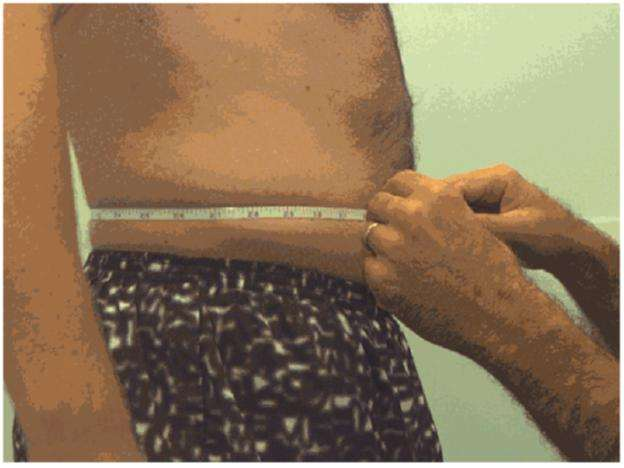
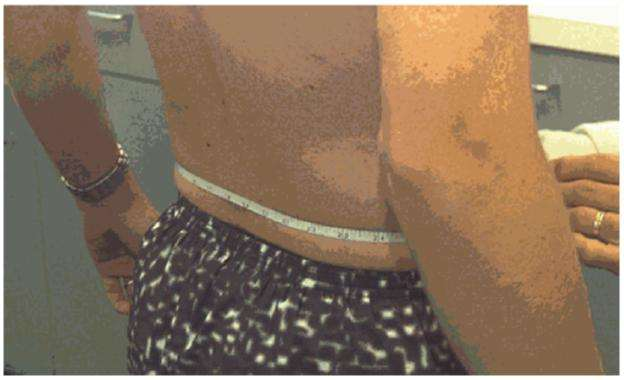
Input Profile: Height: 70 inches (5'10")
- Neck measurement: 15.1 inches → Rounds UP to 15.25 inches
- Abdomen measurement: 38.6 inches → Rounds DOWN to 38.50 inches
- Circumference Value (CV): Abdomen - Neck = 38.50 - 15.25 = 23.25 inches
- Estimated Body Fat: 22% (meets the requirement of ≤ 26% → PASS)
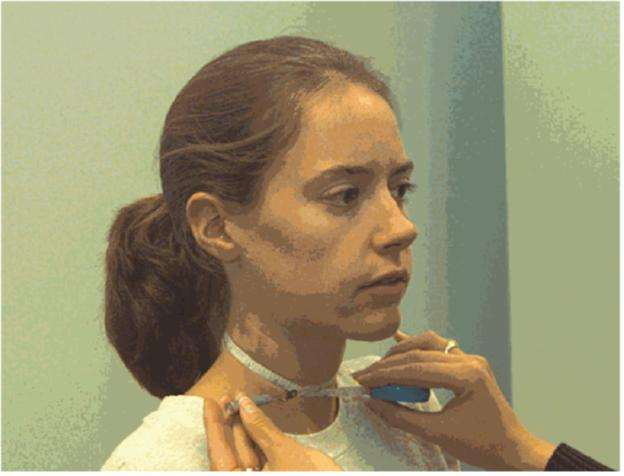
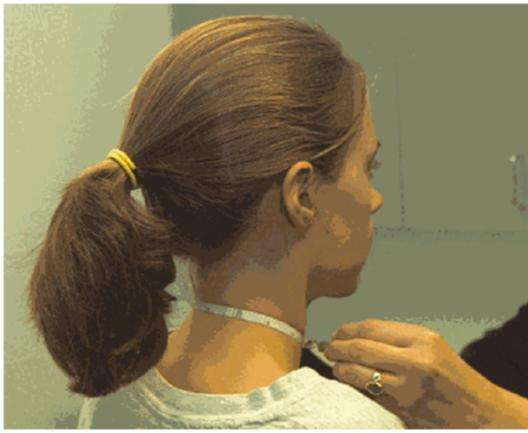
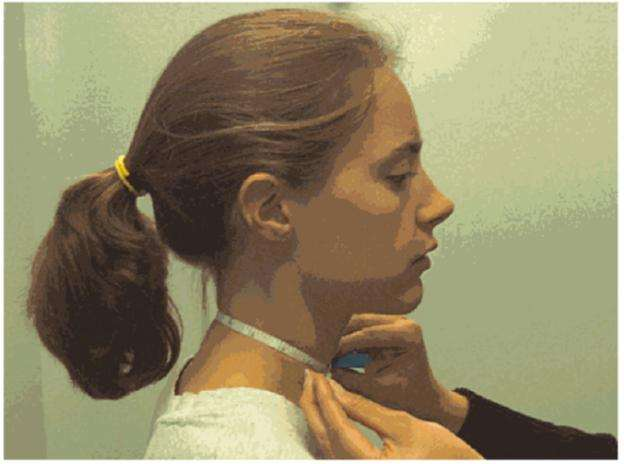
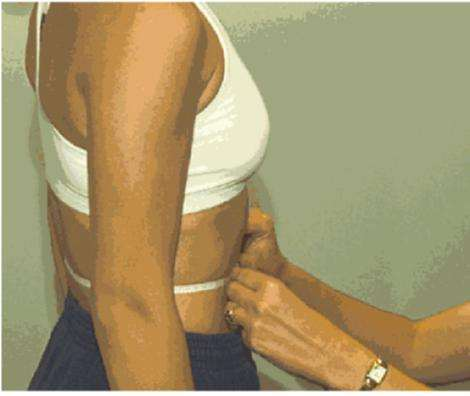
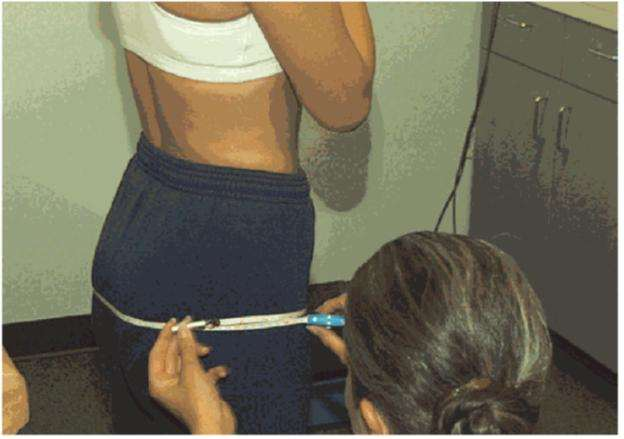
Input Profile: Height: 66 inches (5'6")
- Neck measurement: 13.2 inches → Rounds UP to 13.25 inches
- Waist measurement: 32.4 inches → Rounds DOWN to 32.25 inches
- Buttocks measurement: 40.9 inches → Rounds DOWN to 40.75 inches
- Circumference Value (CV): Waist + Buttocks - Neck = 32.25 + 40.75 - 13.25 = 59.75 inches
- Estimated Body Fat: 33% (meets the requirement of ≤ 36% → PASS)
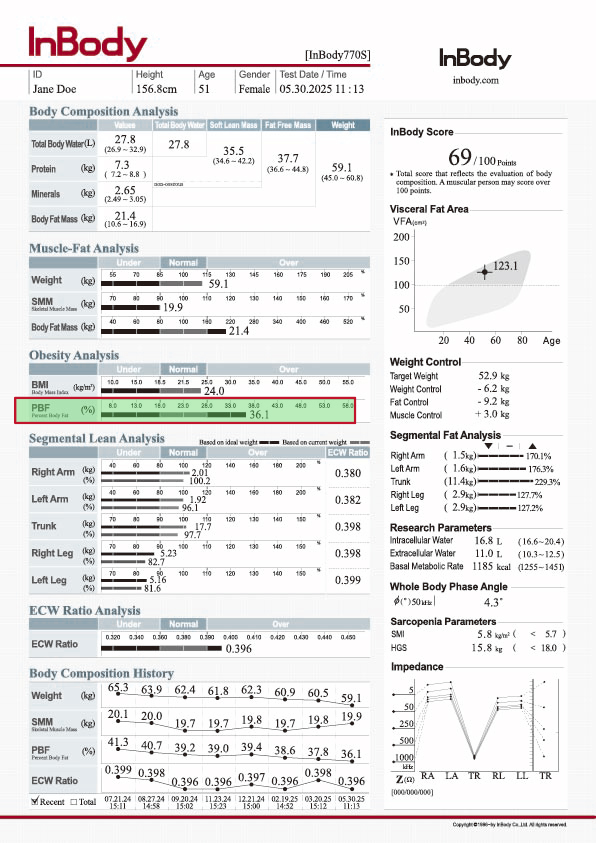
The InBody 770 Scale is the primary bio-impedance analysis tool for the Body Fat Assessment (BFA) / Tier 2 screening. A body fat percentage measurement of ≤ 26.0% for males or ≤ 36.0% for females constitutes a PASS. Below is an example of an InBody 770 result sheet showing the relevant metrics.
Once you calculate your Circumference Value (CV), follow these steps to find your Estimated Body Fat (EBF) percentage in the official lookup tables:
- Locate the correct table for the member's gender:
- Male: Attachment 9 (Table A9.1, starting on page 91 of DAFMAN 36-2905)
- Female: Attachment 10 (Table A10.1, starting on page 99 of DAFMAN 36-2905)
- Find the member's height (in inches) along the top row of the table.
- Find the calculated Circumference Value (CV) along the left column of the table.
- The intersection of the height column and the Circumference Value row yields the **Estimated Body Fat (EBF) Percentage**.
The one-minute push-up is an assessment of muscular strength. It is administered using the following official verbal instructions:
- Starting Position: Place your palms or fists on the floor, hands will be slightly wider than shoulder width apart with your elbows fully extended. Your feet may be no more than 12 inches apart and should not be supported, braced or crossed. Your body should maintain a rigid head to heel form. This is the up or starting position.
- Execution: Begin by lowering your body to the ground until your upper arms are at least parallel to the floor then return to the up position (arms fully extended but not locked). This is one repetition. Your chest may touch but not rest or bounce on the floor. If you do not come down parallel to the floor, the push-up will not count.
- Resting: Resting can only be done in the up position. You may remove your hands or feet from the floor or bridge or bow your back, but only in the up or rest position. Resting any other body part on the floor is not allowed. If resting occurs in the down position, the push-up portion of the assessment will be terminated, and your score will be based on the correct number of push-ups performed up to that point.
- Counting & Monitoring: Your counter will count the correct number of push-ups aloud and will not count incorrect push-ups. Your counter will tell you what you are doing wrong and will repeat the last number of correct push-ups.
The two-minute hand release push-up is an assessment of muscular strength. It is administered using the following official instructions:
- Starting Position: You will begin in the up position and must ensure your hands are flat on the ground with the index fingers inside the outer edges of the shoulders. This is the starting position. Maintain a generally straight body alignment from the top of the head to the ankles. This generally straight position will be maintained for the duration of the exercise.
- Execution: Bend your elbows to lower your body to the ground. The chest, hips and thighs should touch down at the same time. Without moving your head, body, or legs, extend both hands out from the body until your arms are fully extended forming a 90-degree angle between your arms and trunk at the shoulders. Hands must be off the ground. After reaching this position, bend your elbows to move your hands back under your shoulder, index fingers inside the outer edges of the shoulders, and push your whole body back to the starting position. This completes one repetition.
- Resting: Resting can only be done in the up position. You may remove your hands or feet from the floor or bridge or bow your back, but only in the up or rest position. Resting any other body part on the floor is not allowed. If resting occurs in the down position, the hand release push-up portion of the test will be terminated.

The one-minute sit-up is an assessment of core endurance. It is administered using the following official verbal instructions:
- Starting Position: Begin by laying face up on the floor or mat. Your feet may extend off the floor or mat, but your buttocks, shoulders, and head must not extend beyond the mat. Bend your knees at 90 degrees, with your feet or heels in contact with the floor at all times. Cross your arms over your chest with your open hands or fingers at your shoulders or resting on your upper chest.
- Execution: From the starting position, raise your upper torso until your elbows touch your knees or thighs. Then, lower your upper torso until your shoulder blades contact the floor. This is one repetition. Your elbows must touch your knees or thighs at the top, and your shoulder blades must contact the mat at the bottom (keeping hands/fingers in contact with your shoulder/chest at all times). Grabing onto your shirt is not allowed.
- Resting: Any resting must be done in the up position. While resting, you may not use knees or any object to support yourself. If there is any resting other than in the up position, the sit-up portion of the assessment is terminated.
- Toe Hold Rules: If a toe hold bar is used, anchor your feet under the bar (heels on the ground). If a bar is not used, you may request the assessor or a same-sex member to hold your feet using their hands or knees.

The two-minute cross leg reverse crunch is an assessment of core endurance. It is administered using the following official instructions:
- Starting Position: Lie on your back on a flat, level surface, legs straight, and feet on the ground. Arms are crossed over the chest with open hands or fingers touching the shoulders or upper chest (do not grab the shirt). Fold legs so one ankle rests on the opposite knee.
- Execution: While keeping the lower back on the floor, bring both legs toward the chest while reaching your left elbow across your body to touch your right thigh. Return to the starting position (repetition 1). Then, do the same reaching your right elbow across to touch your left thigh and return (repetition 2).
- Form Warnings: Reps do not count if hands lose contact with shoulders, lower back lifts off the ground, elbow misses the thigh, or legs fail to fully extend on return. If you move out of place by more than a foot, you will receive a form warning.
- Resting: Lying flat in the starting position is the designated rest position. Your head does not need to touch the ground.

The forearm plank is an assessment of core endurance. It is administered using the following official instructions:
- Starting Position: Begin face down on the floor with elbows bent, forearms flat on the floor/mat, with the body in a straight line through the head, shoulders, back, buttocks and legs. Elbows must be aligned directly below the shoulders at a 90-degree angle. Hands will be flat on the floor or in fists (pinky side down), forearms parallel or angled inward but hands not clasped. Toes hip-width apart.
- Execution: Lift hips off the ground so only forearms, hands, and toes contact the floor. Maintain a straight body line from head to heels. Involuntary muscle spasms/shaking are permitted as long as proper form is held.
- Termination: The plank ends when maximum time has elapsed, any unauthorized body part touches the floor, head lowers to hands, hands/forearms/feet lift off the floor, or you fail to maintain the 90-degree elbow bend. Receiving 3 form corrections terminates the event.

Cardiorespiratory fitness is assessed via one of the following primary or alternative events:
- 2.0-Mile Timed Run: Timed run conducted on a flat, approved track. Stay on the marked course. Pacing is allowed without physical contact.
- 2.0-Kilometer Walk: An alternative pass/fail event. Keep at least one foot in contact with the ground at all times. Running is prohibited.
- 20m HAMR (Shuttle Run): Progressive timed shuttle run. Arrive at the line before the beep. Three consecutive shuttle misses terminates the assessment.
The timed run is used to measure cardiorespiratory fitness. It is administered using the following official verbal instructions:
- Execution: You will line up behind the starting line and will be instructed to begin running when the stopwatch starts. No physical assistance from anyone or anything is permitted. Pacing is permitted if there is no physical contact and it is not a hindrance to other runners.
- Course Integrity: You are required to stay on and complete the entire marked course. Leaving the course is disqualifying and terminates the assessment.
- Post-Assessment: Your completion time will be recorded when you cross the finish line, and you are required to complete a cool down for approximately five minutes.
The 20-meter HAMR is used to measure cardiorespiratory fitness. It is administered using the following official verbal instructions:
- Execution: You will run between two lines 20 meters apart, at a progressively faster pace, to the tempo of a recorded beep. Arrive at the opposite line and touch it with one foot before the beep sounds. If you get to the line early, do not begin running back before the beep sounds.
- Warnings: Failure to reach the line before the beep, or leaving the line too early, will result in a warning. Three consecutive warnings will terminate the assessment. Successfully reaching the line on the next shuttle resets the warning count to zero.
- Termination: The assessment is terminated upon 3 consecutive warnings, failing to attempt a shuttle (resting or skipping shuttles), stopping before the line and returning, or voluntary termination. Your score is the last successfully completed shuttle.
The 2-kilometer walk measures cardiorespiratory fitness and is administered under the following official verbal instructions:
- Execution: You will line up behind the starting line and begin walking as the stopwatch starts. Walk the 2-kilometer course as quickly as you can. You must not run, keeping at least one foot in contact with the ground at all times.
- Assistance & Pacing: No physical assistance is permitted. Pacing is permitted if there is no physical contact and it is not a hindrance to others.
- Course Integrity: You must stay on and complete the entire marked course. Leaving the course terminates the assessment. You must complete a five-minute cool down.